Serving Models#
SkyServe is SkyPilot’s model serving library. SkyServe takes an existing serving framework and deploys it across one or more regions or clouds.
Why SkyServe?
Bring any serving framework (vLLM, TGI, FastAPI, …) and scale it across regions/clouds
Reduce costs and increase availability of service replicas by leveraging multiple/cheaper locations and hardware (spot instances)
Out-of-the-box load-balancing and autoscaling of service replicas
Privacy and Control: Everything is launched inside your cloud accounts and VPCs
Manage multi-cloud, multi-region deployments with a single control plane
How it works:
Each service gets an endpoint that automatically redirects requests to its replicas.
Replicas of the same service can run in different regions and clouds — reducing cloud costs and increasing availability.
SkyServe handles the load balancing, recovery, and autoscaling of the replicas.
Tip
To get started with SkyServe, use the nightly build of SkyPilot: pip install -U skypilot-nightly
Quick tour: LLM serving#
Here is a simple example of serving an LLM model (Mixtral-8x7B-Instruct-v0.1 on vLLM or lmsys/vicuna-13b-v1.5 on TGI):
# service.yaml
service:
  readiness_probe: /v1/models
  replicas: 2

# Fields below describe each replica.
resources:
  ports: 8080
  accelerators: {L4:8, A10g:8, A100:4, A100:8, A100-80GB:2, A100-80GB:4, A100-80GB:8}

setup: |
  conda create -n vllm python=3.9 -y
  conda activate vllm
  pip install vllm

run: |
  conda activate vllm
  python -m vllm.entrypoints.openai.api_server \
    --tensor-parallel-size $SKYPILOT_NUM_GPUS_PER_NODE \
    --host 0.0.0.0 --port 8080 \
    --model mistralai/Mixtral-8x7B-Instruct-v0.1
# service.yaml
service:
  readiness_probe: /health
  replicas: 2

# Fields below describe each replica.
resources:
  ports: 8080
  accelerators: A100

run: |
  docker run --gpus all --shm-size 1g -p 8080:80 -v ~/data:/data \
    ghcr.io/huggingface/text-generation-inference \
    --model-id lmsys/vicuna-13b-v1.5
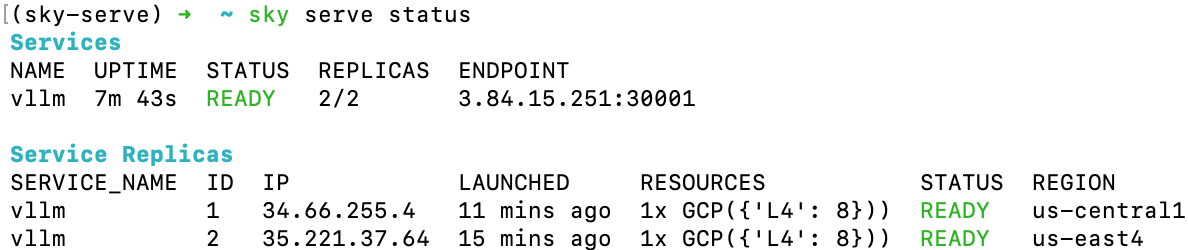
Run sky serve up service.yaml to deploy the service with automatic price and capacity optimization. Once it is deployed, use sky serve status to check the status of the service:

Tip
Notice that the two replicas are launched in different regions/clouds for the lowest cost and highest GPU availability.
This is performed automatically, like a regular sky launch.
If you see the STATUS column becomes READY, then the service is ready to accept traffic!
Simply curl -L the service endpoint, which automatically load-balances across the two replicas:
$ curl -L 3.84.15.251:30001/v1/chat/completions \
    -X POST \
    -d '{"model": "mistralai/Mixtral-8x7B-Instruct-v0.1", "messages": [{"role": "user", "content": "Who are you?"}]}' \
    -H 'Content-Type: application/json'

# Example output:
{"id":"cmpl-80b2bfd6f60c4024884c337a7e0d859a","object":"chat.completion","created":1005,"model":"mistralai/Mixtral-8x7B-Instruct-v0.1","choices":[{"index":0,"message":{"role":"assistant","content":" I am a helpful AI assistant designed to provide information, answer questions, and engage in conversation with users. I do not have personal experiences or emotions, but I am programmed to understand and process human language, and to provide helpful and accurate responses."},"finish_reason":"stop"}],"usage":{"prompt_tokens":13,"total_tokens":64,"completion_tokens":51}}
$ curl -L 44.211.131.51:30001/generate \
    -X POST \
    -d '{"inputs":"What is Deep Learning?","parameters":{"max_new_tokens":20}}' \
    -H 'Content-Type: application/json'

# Example output:
{"generated_text":"\n\nDeep learning is a subset of machine learning that uses artificial neural networks to model and solve"}
Tutorial: Hello, SkyServe!#
Here we will go through an example to deploy a simple HTTP server with SkyServe. To spin up a service, you can simply reuse your task YAML with the two following requirements:
An HTTP endpoint (launched in
runcommands) and the port on which it listens;An extra
servicesection in your task YAML to describe the service configuration.
It is recommended to test it with sky launch first. For example, we have the following task YAML works with sky launch:
resources:
  ports: 8080
  cpus: 2

workdir: .

run: python -m http.server 8080
And under the same directory, we have an index.html:
<html>
<head>
    <title>My First SkyServe Service</title>
</head>
<body>
    <p>Hello, SkyServe!</p>
</body>
</html>
Note
workdir and file mounts with local files will be automatically uploaded to a cloud bucket. The bucket will be created, and cleaned up after the service is terminated.
Notice that task YAML already has a running HTTP endpoint at 8080, and exposed
through the ports section under resources. Suppose we want to
scale it to multiple replicas across multiple regions/clouds with SkyServe. We
can simply add a service section to the YAML:
# hello-sky-serve.yaml
service:
  readiness_probe: /
  replicas: 2

resources:
  ports: 8080
  cpus: 2

workdir: .

run: python -m http.server 8080
This example will spin up two replicas of the service,
each listening on port 8080. A replica is considered ready when it responds to
GET / with a 200 status code. You can customize the readiness
probe by specifying a different path in the readiness_probe field.
You can find more configurations at Service YAML Specification.
Use sky serve up to spin up the service:
$ sky serve up hello-sky-serve.yaml
SkyServe will start (or reuse) a centralized controller/load balancer and deploy the service replicas to the cloud location(s) with the best price and availability. SkyServe will also monitor the service status and re-launch a new replica if one of them fails.
Under the hood, sky serve up:
Launches a controller which handles autoscaling, monitoring and load balancing;
Returns a Service Endpoint which will be used to accept traffic;
Meanwhile, the controller provisions replica VMs which later run the services;
Once any replica is ready, the requests sent to the Service Endpoint will be HTTP-redirect to one of the endpoint replicas.
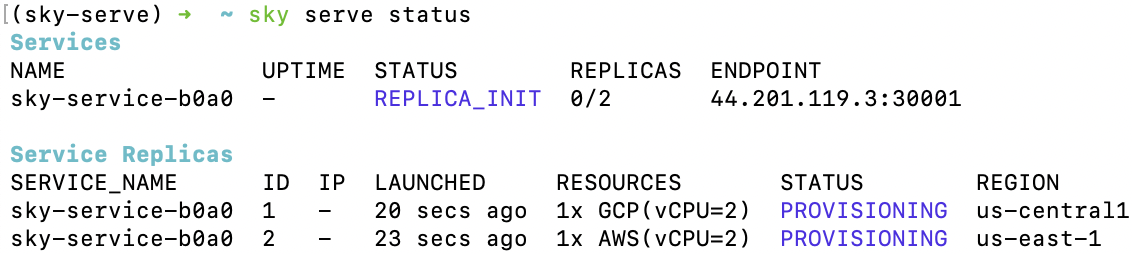
After the controller is provisioned, you’ll see the following in sky serve status output:
You can use watch to monitor the service status:
$ watch -n10 sky serve status
Once any of the replicas becomes ready to serve (READY), you can start
sending requests to <endpoint-url> (e.g., 44.201.119.3:30001):
$ curl -L <endpoint-url>
<html>
<head>
    <title>My First SkyServe Service</title>
</head>
<body>
    <p>Hello, SkyServe!</p>
</body>
</html>
Note
Since we are using HTTP-redirect, we need to use curl -L
<endpoint-url>. The curl command by default won’t follow the
redirect.
Tutorial: Serve a Chatbot LLM!#
Let’s bring up a real LLM chat service with FastChat + Vicuna. We’ll use the Vicuna OpenAI API Endpoint YAML as an example:
resources:
  ports: 8080
  accelerators: A100:1
  disk_size: 1024
  disk_tier: best

setup: |
  conda activate chatbot
  if [ $? -ne 0 ]; then
    conda create -n chatbot python=3.9 -y
    conda activate chatbot
  fi

  # Install dependencies
  pip install "fschat[model_worker,webui]==0.2.24"
  pip install protobuf

run: |
  conda activate chatbot

  echo 'Starting controller...'
  python -u -m fastchat.serve.controller > ~/controller.log 2>&1 &
  sleep 10
  echo 'Starting model worker...'
  python -u -m fastchat.serve.model_worker \
            --model-path lmsys/vicuna-${MODEL_SIZE}b-v1.3 2>&1 \
            | tee model_worker.log &

  echo 'Waiting for model worker to start...'
  while ! `cat model_worker.log | grep -q 'Uvicorn running on'`; do sleep 1; done

  echo 'Starting openai api server...'
  python -u -m fastchat.serve.openai_api_server \
    --host 0.0.0.0 --port 8080 | tee ~/openai_api_server.log

envs:
  MODEL_SIZE: 7
The above SkyPilot Task YAML will launch an OpenAI API endpoint with a Vicuna 7B
model. This YAML can be used with regular sky launch to launch a single
replica of the service.
However, by adding a service section to the YAML, we can scale it
to multiple replicas across multiple regions/clouds:
# vicuna.yaml
service:
  readiness_probe: /v1/models
  replicas: 3

resources:
  ports: 8080
  # Here goes other resources config

# Here goes other task config
Now we have a Service YAML that can be used with SkyServe! Simply run
$ sky serve up vicuna.yaml -n vicuna
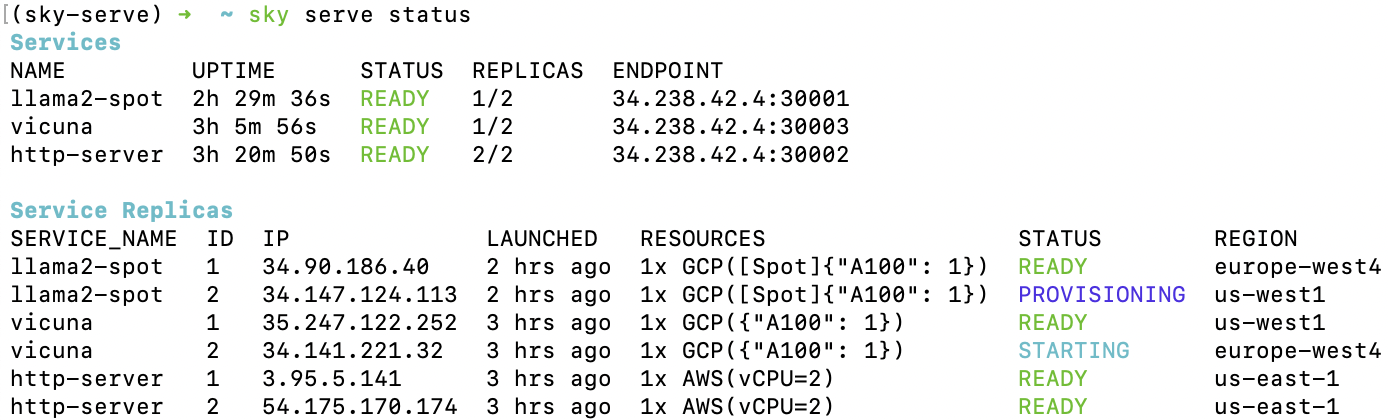
to deploy the service (use -n to give your service a name!). After a while, there will be an OpenAI Compatible API endpoint ready to accept traffic (44.201.113.28:30001 in the following example):

Send a request using the following cURL command:
$ curl -L http://<endpoint-url>/v1/chat/completions \
    -X POST \
    -d '{"model":"vicuna-7b-v1.3","messages":[{"role":"system","content":"You are a helpful assistant."},{"role":"user","content":"Who are you?"}],"temperature":0}' \
    -H 'Content-Type: application/json'

# Example output:
{"id":"chatcmpl-gZ8SfgUwcm9Xjbuv4xfefq","object":"chat.completion","created":1702082533,"model":"vicuna-7b-v1.3","choices":[{"index":0,"message":{"role":"assistant","content":"I am Vicuna, a language model trained by researchers from Large Model Systems Organization (LMSYS)."},"finish_reason":"stop"}],"usage":{"prompt_tokens":19,"total_tokens":43,"completion_tokens":24}}
You can also use a simple chatbot Python script to send requests:
import openai

stream = True
model = 'vicuna-7b-v1.3' # This is aligned with the MODEL_SIZE env in the YAML
init_prompt = 'You are a helpful assistant.'
history = [{'role': 'system', 'content': init_prompt}]
endpoint = input('Endpoint: ')
openai.api_base = f'http://{endpoint}/v1'
openai.api_key = 'placeholder'

try:
    while True:
        user_input = input('[User] ')
        history.append({'role': 'user', 'content': user_input})
        resp = openai.ChatCompletion.create(model=model,
                                            messages=history,
                                            stream=True)
        print('[Chatbot]', end='', flush=True)
        tot = ''
        for i in resp:
            dlt = i['choices'][0]['delta']
            if 'content' not in dlt:
                continue
            print(dlt['content'], end='', flush=True)
            tot += dlt['content']
        print()
        history.append({'role': 'assistant', 'content': tot})
except KeyboardInterrupt:
    print('\nBye!')
Useful CLIs#
Here are some commands for SkyServe. Check sky serve --help for more details.
See all running services:
$ sky serve status
Stream the logs of a service:
$ sky serve logs vicuna 1 # tail logs of replica 1, including provisioning and running logs
$ sky serve logs vicuna --controller # tail controller logs
$ sky serve logs vicuna --load-balancer --no-follow # print the load balancer logs so far, and exit
Terminate services:
$ sky serve down http-server # terminate the http-server service
$ sky serve down --all # terminate all services
Autoscaling#
See Autoscaling for more information.
SkyServe Architecture#
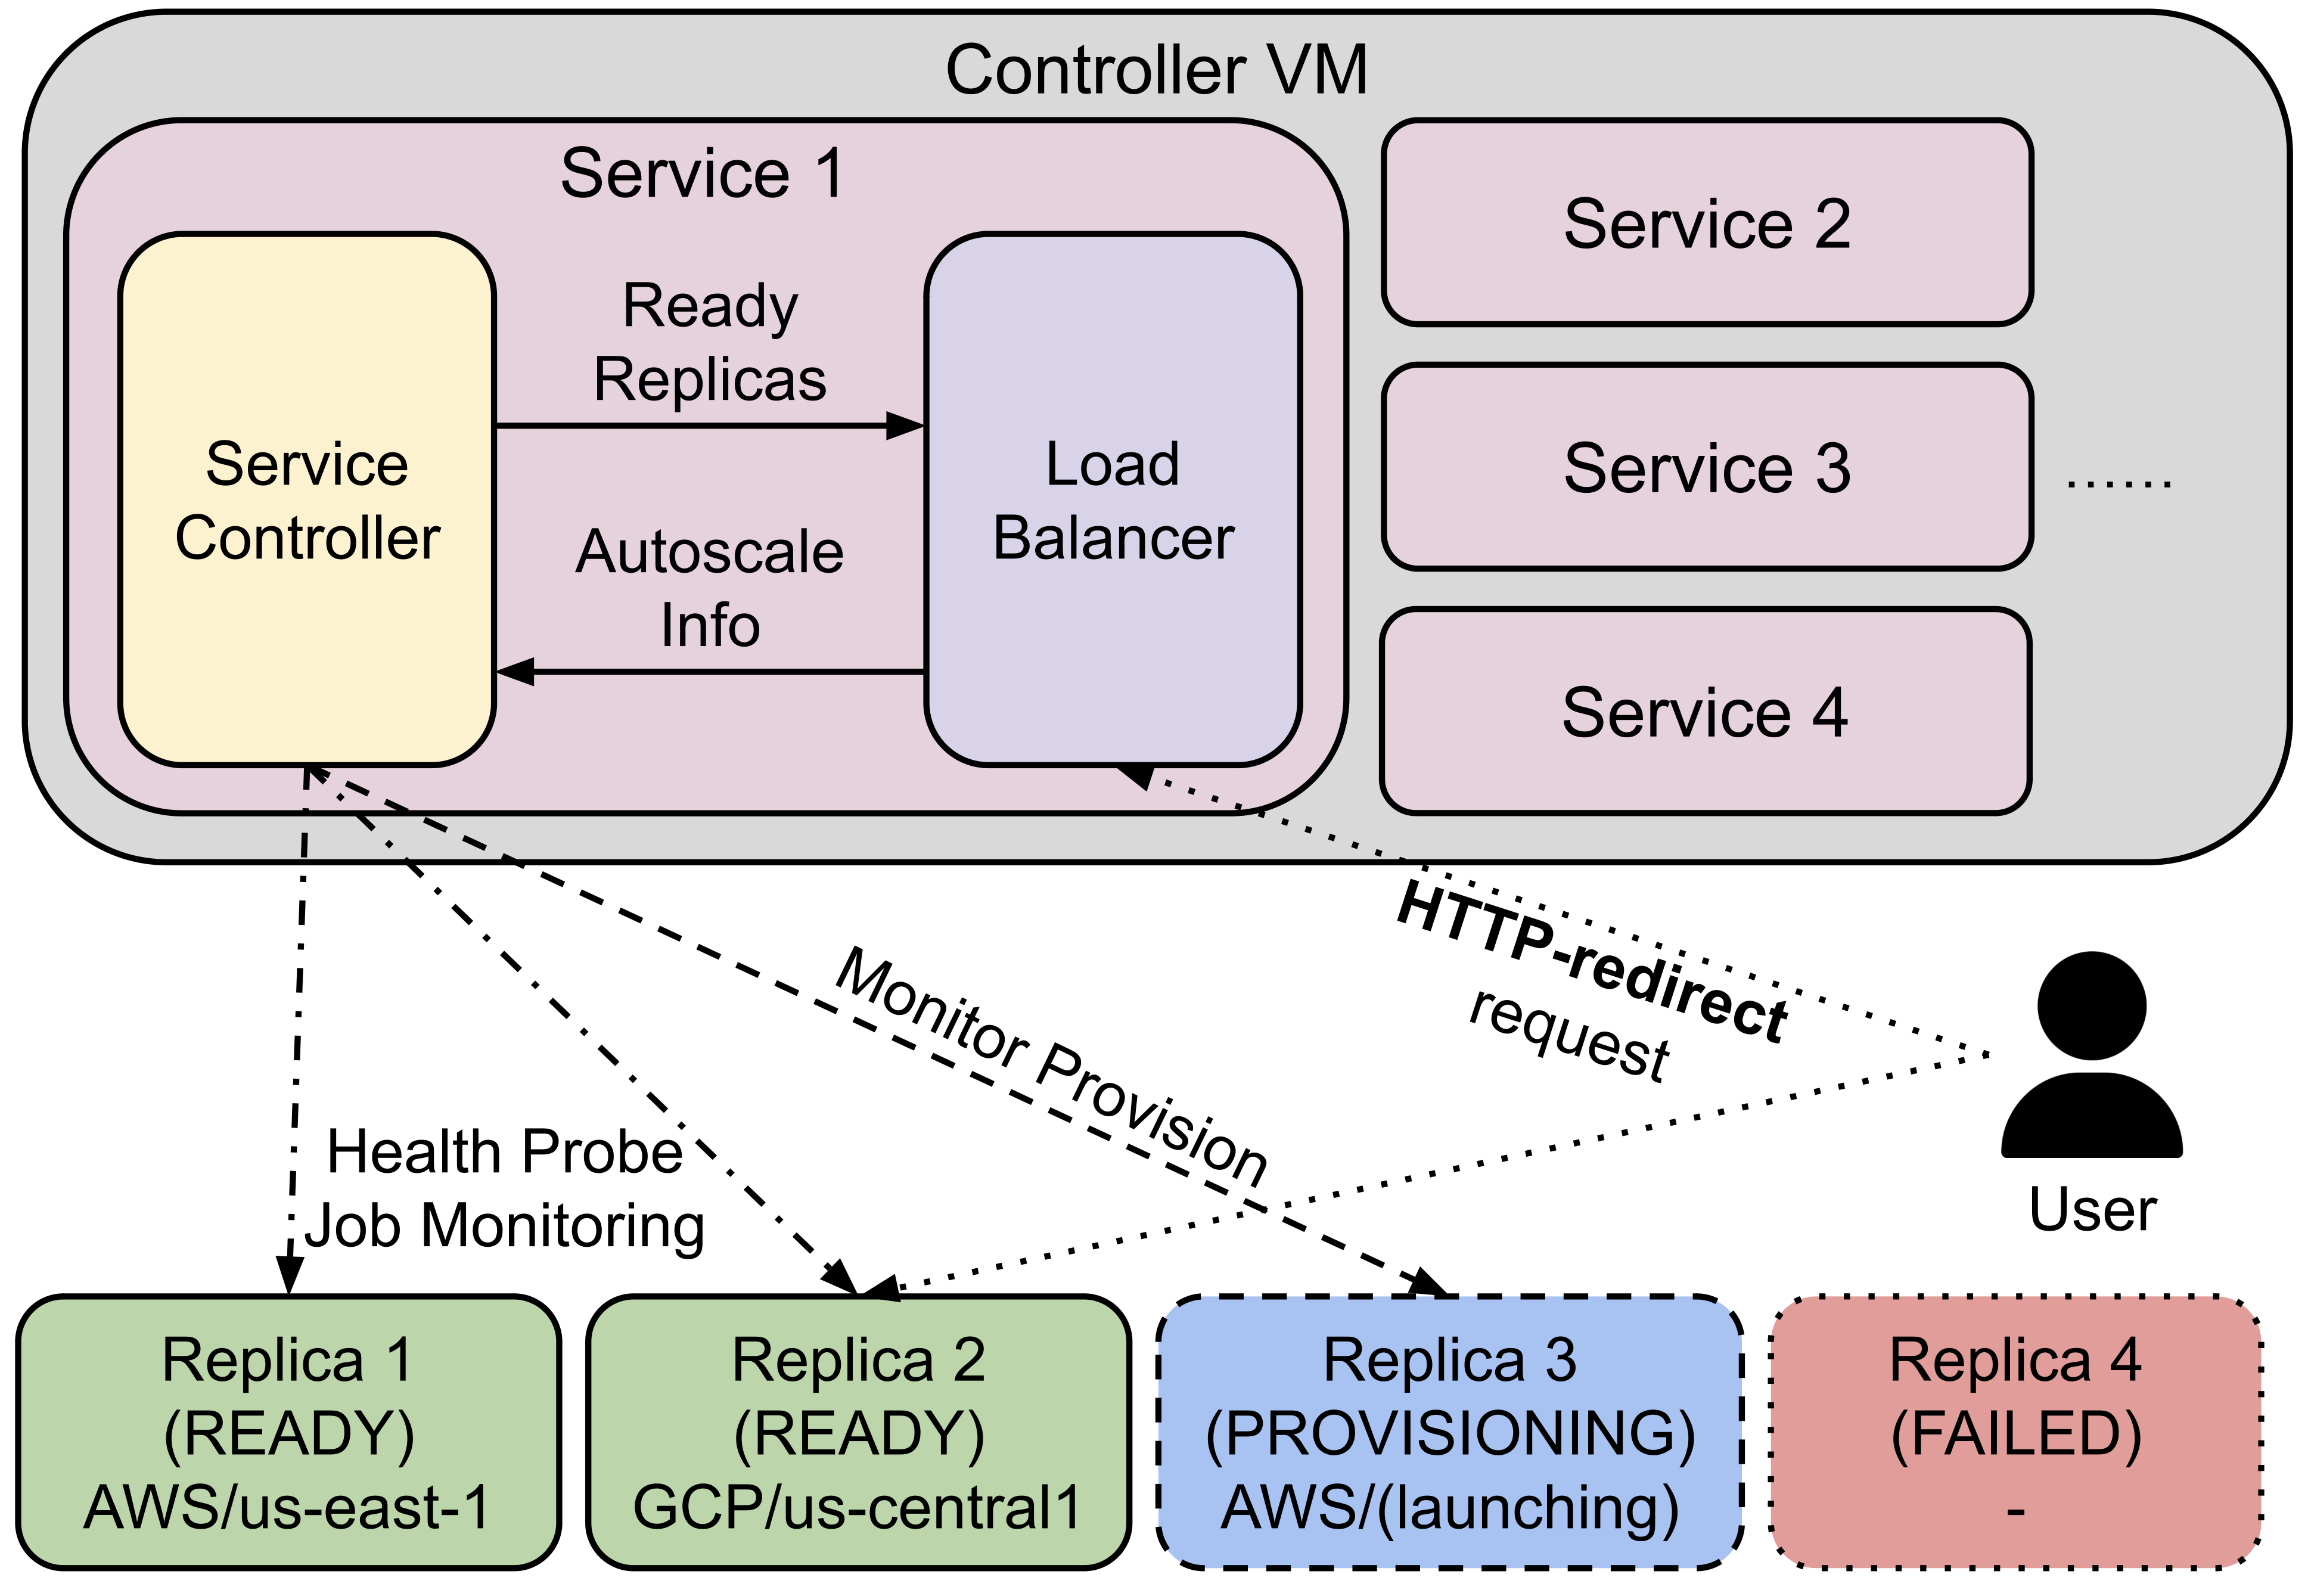
SkyServe has a centralized controller VM that manages the deployment of your service. Each service will have a process group to manage its replicas and route traffic to them.
It is composed of the following components:
Controller: The controller will monitor the status of the replicas and re-launch a new replica if one of them fails. It also autoscales the number of replicas if autoscaling config is set (see Service YAML spec for more information).
Load Balancer: The load balancer will route the traffic to all ready replicas. It is a lightweight HTTP server that listens on the service endpoint and HTTP-redirects the requests to one of the replicas.
All of the process group shares a single controller VM. The controller VM will be launched in the cloud with the best price/performance ratio. You can also customize the controller resources based on your needs.
SkyServe controller#
The SkyServe controller is a small on-demand CPU VM running in the cloud that:
Manages the deployment of your service;
Monitors the status of your service;
Routes traffic to your service replicas.
It is automatically launched when the first service is deployed, and it is autostopped after it has been idle for 10 minutes (i.e., after all services are terminated). Thus, no user action is needed to manage its lifecycle.
You can see the controller with sky status and refresh its status by using the -r/--refresh flag.
Customizing SkyServe controller resources#
You may want to customize the resources of the SkyServe controller for several reasons:
Use a lower-cost controller. (if you have a few services running)
Enforcing the controller to run on a specific location. This is particularly useful when you want the service endpoint within specific geographical region. (Default: cheapest location)
Changing the maximum number of services that can be run concurrently, which is the minimum number between 4x the vCPUs of the controller and the memory in GiB of the controller. (Default: 16)
Changing the disk_size of the controller to store more logs. (Default: 200GB)
To achieve the above, you can specify custom configs in ~/.sky/config.yaml with the following fields:
serve:
  # NOTE: these settings only take effect for a new SkyServe controller, not if
  # you have an existing one.
  controller:
    resources:
      # All configs below are optional.
      # Specify the location of the SkyServe controller.
      cloud: gcp
      region: us-central1
      # Specify the maximum number of services that can be run concurrently.
      cpus: 2+  # number of vCPUs, max concurrent services = min(4 * cpus, memory in GiB)
      # Specify the disk_size in GB of the SkyServe controller.
      disk_size: 1024
The resources field has the same spec as a normal SkyPilot job; see here.
Note
These settings will not take effect if you have an existing controller (either stopped or live). For them to take effect, tear down the existing controller first, which requires all services to be terminated.